
Home Exercise Library
Wall Slides and Wall Angels
Demonstration video: Wall Angels (Harris Health). Follow the steps on this page if the video differs.
In our programs
- Upper and Mid Back, Phase 1 MB-1 #3
- Upper and Mid Back, Phase 4 MB-4 #3
- Shoulder, Phase 2 SH-2 #1
The dose and steps can differ by program.
Upper and Mid Back, Phase 1: Wall Angels MB-1 #3
Wake up upper back muscles
Photos
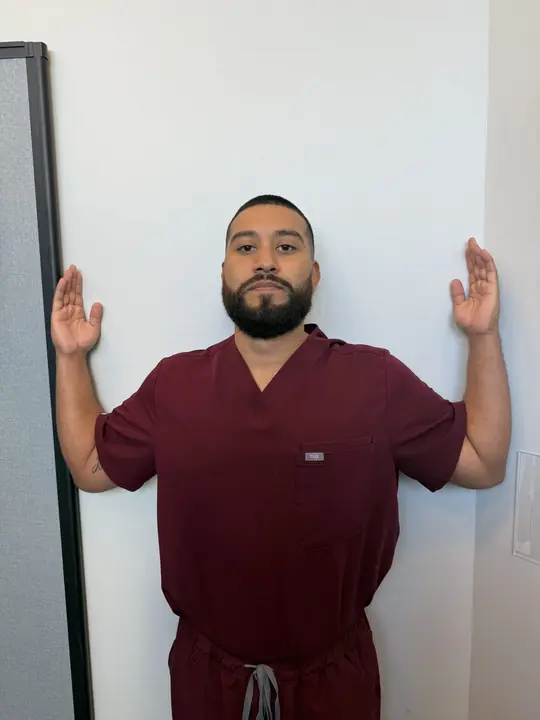
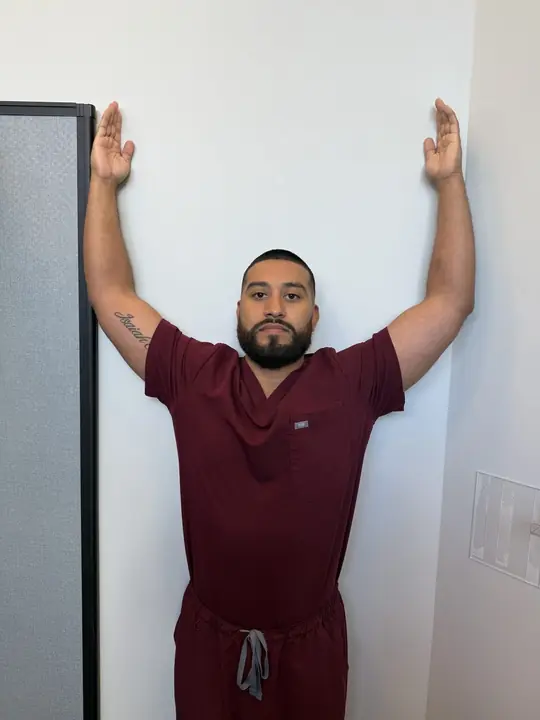
Why it helps
This move wakes up the muscles between your shoulder blades and along your mid-back. It also gently opens up the front of your shoulders, which usually round forward after an injury.
How to do it
- Stand with your back flat against a wall. Heels about 6 inches from the wall.
- Press your low back, mid back, and head against the wall.
- Raise your arms to the side at shoulder height, elbows bent 90 degrees, backs of hands and elbows against the wall.
- Slowly slide your arms up the wall as high as you can while keeping contact. Stop where you lose contact.
- Slowly slide back down. Do 10 reps.
Too hard? Try this
If your arms cannot touch the wall, start with arms a few inches off the wall and just do the motion. Or do it with your back flat on the floor.
Too easy? Try this
Hold each rep for 3 seconds at the top. Or do it slower with a 5-second up, 5-second down count.
Common mistakes
- Your low back arches off the wall.
- You shrug your shoulders to your ears.
- You go higher than you should and lose contact with the wall.
You should feel
- Work in your mid and upper back muscles.
- Light stretch across your chest.
You should not feel
- Sharp pain in your shoulders or neck.
- Pinching at the top of your shoulders.
Stop right away if
- Sharp pain down your arm.
- Numb or tingly hand or fingers.
- Sudden weak grip.
If you are one of our current patients, call the clinic and inform your provider right away, or seek emergency care right away. For a life-threatening emergency, call 911.
Upper and Mid Back, Phase 4: Wall Slides + Chin Tuck MB-4 #3
Posture endurance
Photos
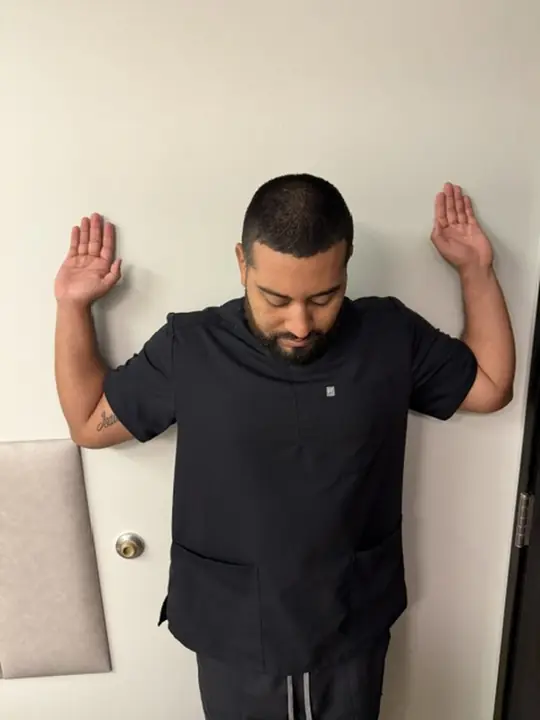
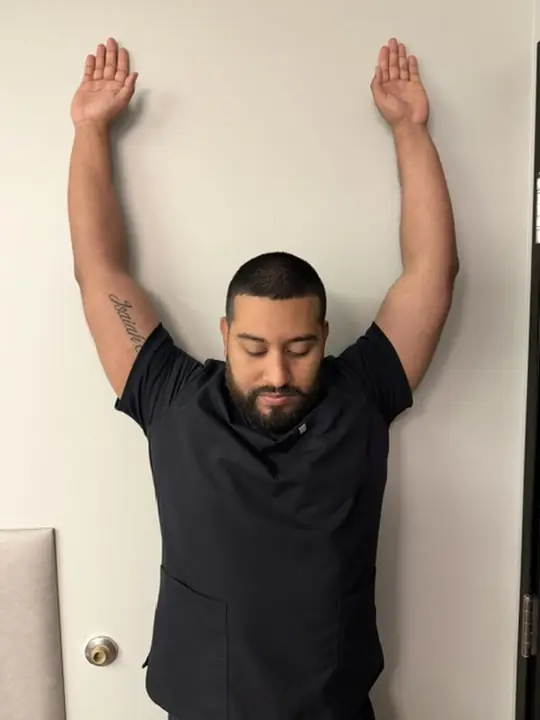
Why it helps
This adds a small chin tuck (a gentle nod that presses the back of your head into the wall) to the wall slide you learned as Wall Angels in Phase 1. It works on the endurance to hold good posture without thinking about it.
How to do it
- Stand with your back flat against a wall. Heels about 6 inches from the wall.
- Press your low back, mid back, and head against the wall. Add a small chin tuck (the back of your head presses lightly into the wall).
- Raise your arms to the side at shoulder height, elbows bent 90 degrees, backs of hands and elbows against the wall.
- Slowly slide your arms up the wall while keeping the chin tuck and full wall contact. Stop at the highest point where you can keep contact.
- Slowly slide back down. Do 10 reps. Keep the chin tuck the whole time.
Too hard? Try this
Skip the chin tuck and just do the wall slide. Or start with arms a few inches off the wall.
Too easy? Try this
Hold the top position for 3 seconds. Or do them slow: 5-second up, 5-second down.
Common mistakes
- You lose the chin tuck as your arms move.
- Your low back arches off the wall.
- You shrug your shoulders.
You should feel
- Work in your mid back and the front of your neck.
- Good posture feeling.
You should not feel
- Sharp pain in your shoulders or neck.
- Pinching.
Stop right away if
- Sharp pain down your arm.
- Numb or tingly hand.
- Dizzy.
If you are one of our current patients, call the clinic and inform your provider right away, or seek emergency care right away. For a life-threatening emergency, call 911.
Shoulder, Phase 2: Scapular Wall Slides SH-2 #1
Combined scapular control and overhead ROM
Photos
Why it helps
Your shoulder blade has to glide upward and outward as your arm goes overhead. After an injury, this glide gets sticky. Wall slides retrain the pattern with the wall giving you feedback so you do it right.
How to do it
- Stand with your back against a wall. Heels about 6 inches from the wall. Knees slightly bent.
- Press your low back, mid back, and the back of your head GENTLY into the wall. Pull your belly button in slightly.
- Place the BACKS of your hands and elbows against the wall, with elbows bent 90 degrees at shoulder height (like a goal-post or "W" shape).
- Slowly slide your arms UP the wall while keeping the backs of your hands and elbows in contact with the wall. Go only as high as you can maintain contact.
- Slowly slide back down to the goal-post position. Do 10 reps.
Too hard? Try this
Only slide halfway up. Or do them without the wall (just in front of a mirror) until shoulder allows wall contact.
Too easy? Try this
Add a 3-second hold at the top of each rep. Or hold a light band between your hands to create gentle outward tension.
Common mistakes
- You let your hands or elbows come away from the wall.
- Your low back arches off the wall.
- You shrug your shoulders toward your ears as you slide up.
You should feel
- Work in the middle and lower part of your back, between the shoulder blades.
- Smooth, controlled motion.
You should not feel
- Sharp shoulder pain.
- Pinching at the top of the shoulder.
- Low back pain.
Stop right away if
- Sharp shoulder pain.
- Pop or catch in the shoulder.
- Numbness or tingling down the arm.
If you are one of our current patients, call the clinic and inform your provider right away, or seek emergency care right away. For a life-threatening emergency, call 911.
Research behind this program
- Jang HJ, Hughes LC, Oh DW, Kim SY. J Geriatr Phys Ther, 2019. PMID 28914720
- Ravichandran H, et al. J Exerc Rehabil, 2020. PMID 32724778
Auto Injury Chiropractic
Same-day visits at three clinics
Oregon City
1404 Molalla Ave
Oregon City, OR 97045
Mon to Thu 9:00am to 6:00pm
Fri 9:00am to 1:00pm
Milwaukie
13152 SE Rusk Rd
Milwaukie, OR 97222
Mon to Thu 9:00am to 6:00pm
Fri 9:00am to 1:00pm
Troutdale
233 E Columbia River Hwy
Troutdale, OR 97060
Mon to Thu 9:00am to 6:00pm
Fri 9:00am to 1:00pm