
Home Exercise Library
Hip Hinge (bodyweight and loaded)
Demonstration video: How To Perform A Dowel Hip Hinge (Champion Physical Therapy and Performance). Follow the steps on this page if the video differs.
In our programs
- Low Back and SI Joint, Phase 3 LB-3 #4
- Low Back and SI Joint, Phase 4 LB-4 #4
The dose and steps can differ by program.
Low Back and SI Joint, Phase 3: Hip Hinge (Body Weight) LB-3 #4
Teach safe bending pattern
Photos
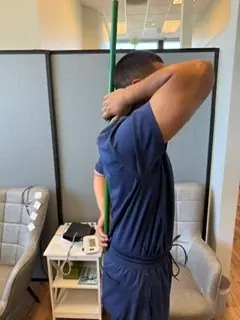
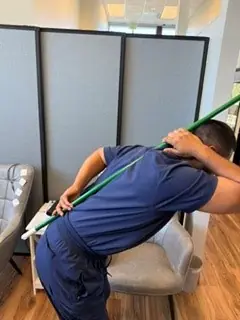
Why it helps
The hip hinge is a way to bend over while keeping your spine long. Instead of rounding your low back to pick something up, you fold at your hips. This exercise works on learning that pattern.
How to do it
- Stand tall, feet hip-width apart. Hold a broomstick along your back so it touches the back of your head, your mid back, and your tailbone. (Or just imagine it.)
- Keep a soft bend in your knees. They do not move much in this exercise.
- Push your hips straight backward, like trying to close a car door with your butt.
- Let your trunk lean forward at the hips. The broomstick should stay in contact with all 3 points the whole way.
- Stop when your trunk is about parallel to the floor, or sooner if your back rounds. Slowly stand back up. Do 10 reps.
Too hard? Try this
Only hinge halfway. Build up over the phase. Or skip the broomstick and just practice the motion against a wall (hips push back to touch the wall behind you).
Too easy? Try this
Hold a light water bottle or weight in each hand at your sides. Or pause 2 seconds at the bottom.
Common mistakes
- Your back rounds. (The broomstick lifts off your back.)
- You bend your knees too much. (This makes it a squat, not a hinge.)
- You let your head drop down or look up sharply.
You should feel
- A stretch in the back of your thighs (hamstrings).
- Your hips pushing backward.
- Your spine staying long and flat.
You should not feel
- Sharp pain in your low back.
- A rounding feeling in your low back.
Stop right away if
- Sharp low back pain.
- Pain shooting down a leg.
- Knee pain that does not stop.
If you are one of our current patients, call the clinic and inform your provider right away, or seek emergency care right away. For a life-threatening emergency, call 911.
Low Back and SI Joint, Phase 4: Loaded Hip Hinge LB-4 #4
Real-world safe lifting pattern
Photos
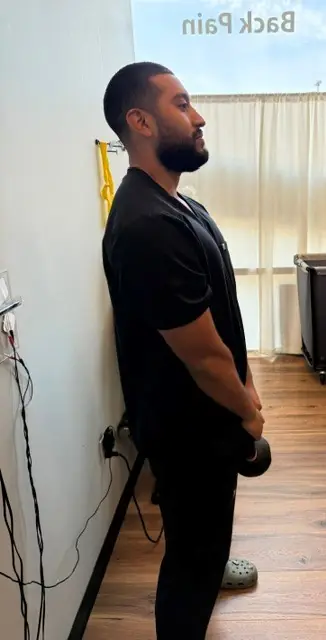
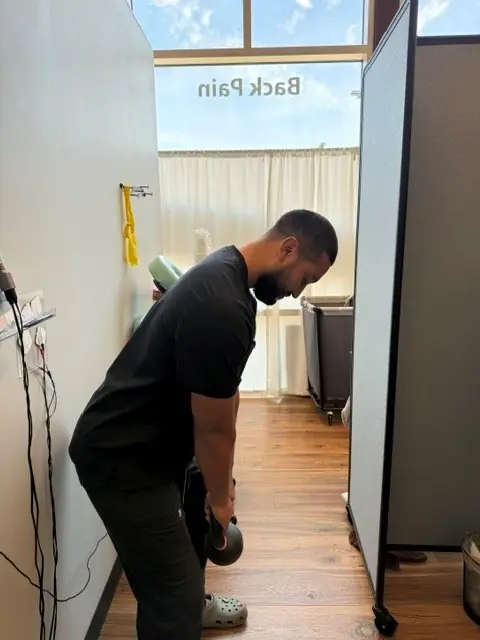
Why it helps
Last phase you learned the hip hinge with your body weight. Now you add light load. This trains the pattern for picking something up off the floor, from a grocery bag to a child.
How to do it
- Stand tall, feet hip-width apart, with the weight on the floor in front of you.
- Push your hips backward and hinge forward at the hips, keeping your spine long. (Same as Phase 3 hip hinge.)
- Reach down and grab the weight with both hands or one hand. Do NOT let your back round.
- Squeeze your buttocks and push your hips forward to stand back up. The weight comes with you.
- Reverse the motion: push hips backward, hinge forward, lower the weight to the floor. Do 10 reps.
Too hard? Try this
Use a lighter weight, or just an empty water bottle. Or hinge only halfway down.
Too easy? Try this
Use a heavier weight. Or hold the bottom position for 2 seconds before standing up.
Common mistakes
- Your back rounds at the bottom.
- You bend your knees too much and turn it into a squat.
- You snap your back to stand up instead of pushing through your hips and glutes.
You should feel
- A stretch in the back of your thighs at the bottom.
- Strong work in your buttocks as you stand up.
- Your spine staying long the whole time.
You should not feel
- Sharp low back pain.
- A rounding feeling in your low back.
- Pain shooting down a leg.
Stop right away if
- Sharp low back pain.
- Pain shooting down a leg.
- Numb or tingly leg or foot after the exercise.
If you are one of our current patients, call the clinic and inform your provider right away, or seek emergency care right away. For a life-threatening emergency, call 911.
Research behind this program
- Akuthota V, Ferreiro A, Moore T, Fredericson M. Curr Sports Med Rep, 2008. PMID 18296944
Auto Injury Chiropractic
Same-day visits at three clinics
Oregon City
1404 Molalla Ave
Oregon City, OR 97045
Mon to Thu 9:00am to 6:00pm
Fri 9:00am to 1:00pm
Milwaukie
13152 SE Rusk Rd
Milwaukie, OR 97222
Mon to Thu 9:00am to 6:00pm
Fri 9:00am to 1:00pm
Troutdale
233 E Columbia River Hwy
Troutdale, OR 97060
Mon to Thu 9:00am to 6:00pm
Fri 9:00am to 1:00pm