
Home Exercise Library
Band Rows
Demonstration video: Standing Shoulder Row With Anchored Resistance (OrthoIndy). Follow the steps on this page if the video differs.
In our programs
- Neck and Whiplash, Phase 3 NK-3 #2
- Upper and Mid Back, Phase 3 MB-3 #1
- Shoulder, Phase 3 SH-3 #2
The dose and steps can differ by program.
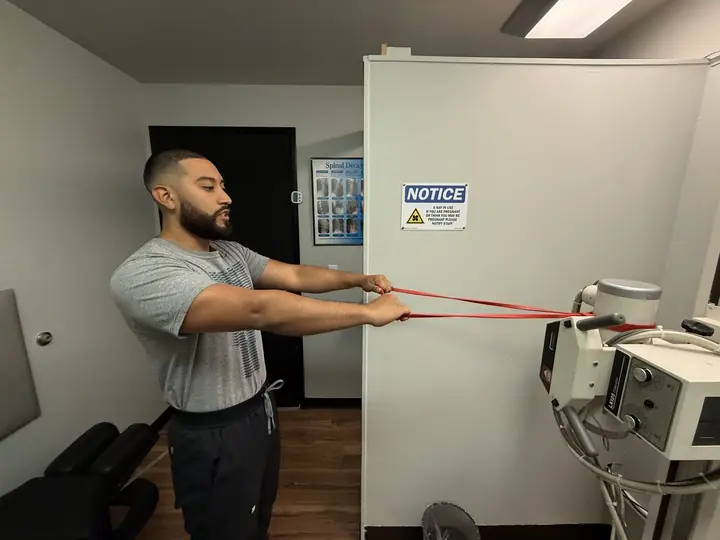
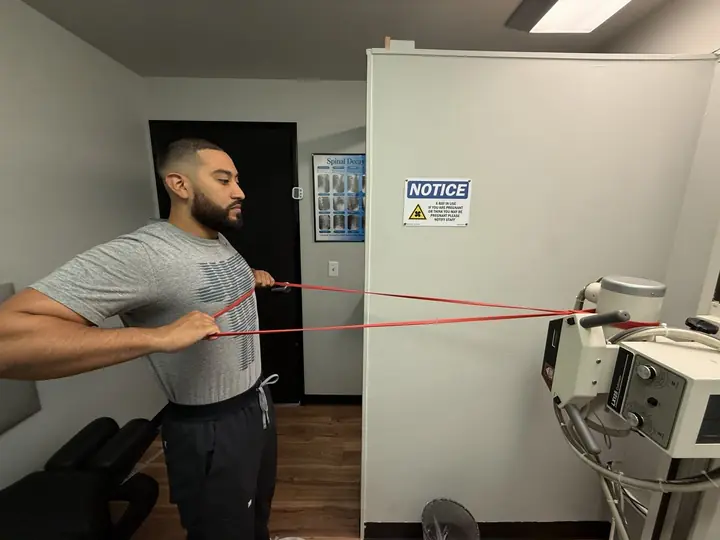
Neck and Whiplash, Phase 3: Band Rows with Shoulder Set NK-3 #2
Strengthen mid-back
Photos
Why it helps
This combines the shoulder set you have been doing with a real pulling motion. Strong mid-back muscles take pressure off your neck during everyday tasks like driving, typing, and lifting.
How to do it
- Anchor the band at chest height (a doorknob or sturdy post).
- Stand facing the anchor. Hold one band end in each hand. Step back until the band is taut with arms straight.
- Set your shoulder blades down and back first. (This is your Phase 1 and 2 move.)
- Keeping shoulder blades set, pull both elbows straight back past your ribs. Squeeze gently.
- Slow return. Rest 2 seconds. Do 12 reps.
Too hard? Try this
Use a lighter band or step closer to the anchor. Do 8 reps.
Too easy? Try this
Use a heavier band or step further from the anchor. Add a 2-second hold at the end of each pull.
Common mistakes
- Your shoulders shrug up as you pull.
- Your chin pokes forward.
- You arch your low back to pull harder.
You should feel
- Work between your shoulder blades.
- Your chest opens as your elbows pull back.
You should not feel
- Burning or sharp pain in your neck.
- Pinching at the front of your shoulder.
Stop right away if
- Sharp shooting pain down your arm.
- Numb or tingly hand.
- Sudden weak grip.
If you are one of our current patients, call the clinic and inform your provider right away, or seek emergency care right away. For a life-threatening emergency, call 911.
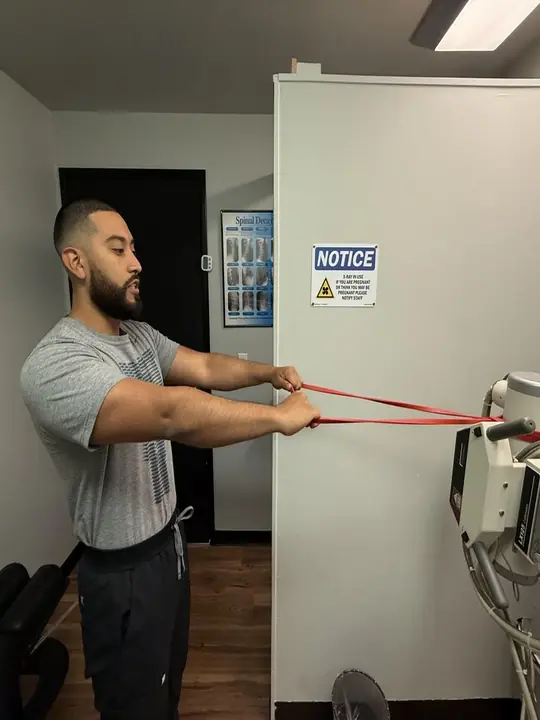
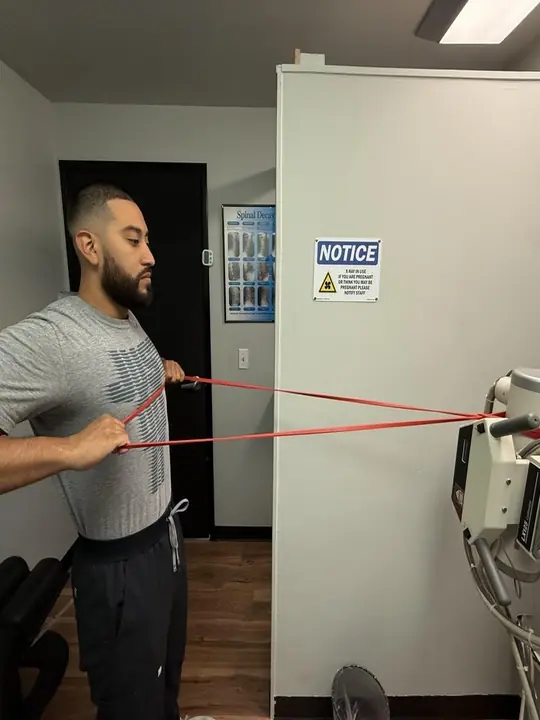
Upper and Mid Back, Phase 3: Band Rows MB-3 #1
Strengthen your mid back and shoulder blades
Photos
Why it helps
This builds strength in your mid back and shoulder blades. Strong mid-back muscles help support your spine during everyday tasks like driving, lifting, and reaching.
How to do it
- Anchor the band at chest height.
- Stand facing the anchor. Hold one band end in each hand. Step back until the band is taut with arms straight.
- Set your shoulder blades down and back first.
- Keeping shoulder blades set, pull both elbows straight back past your ribs. Squeeze gently.
- Slow return. Rest 2 seconds. Do 12 reps.
Too hard? Try this
Use a lighter band or step closer to the anchor. Do 8 reps.
Too easy? Try this
Use a heavier band or step further from the anchor. Add a 2-second hold at the end of each pull.
Common mistakes
- Your shoulders shrug up as you pull.
- Your chin pokes forward.
- You arch or round your back.
You should feel
- Work between your shoulder blades.
- Your chest opens as your elbows pull back.
You should not feel
- Sharp pain in your spine or shoulders.
- Pinching at the front of your shoulder.
Stop right away if
- Sharp shooting pain down your arm.
- Numb or tingly hand.
- Sudden weak grip.
If you are one of our current patients, call the clinic and inform your provider right away, or seek emergency care right away. For a life-threatening emergency, call 911.
Shoulder, Phase 3: Band Rows SH-3 #2
Strengthen back of shoulder and mid back
Photos
Why it helps
Pulling motions like rows are the opposite of the slouched, forward-rolled posture most people fall into after a crash. Rows work on strengthening the back of the shoulders and the mid back, which help support the shoulder joint.
How to do it
- Anchor a band to a doorknob at chest height. Stand facing the anchor, feet hip-width apart.
- Hold the ends of the band in each hand. Step back until you feel tension. Arms straight out in front of you at shoulder height.
- Pull your shoulder blades DOWN and BACK first (squeeze them together).
- Then pull the band toward you by bending the elbows. Elbows tuck along your sides, NOT flaring out.
- Hold 3 seconds at the end. Slowly return. Do 12 reps.
Too hard? Try this
Use a lighter band. Or do 8 reps. Or do them one arm at a time.
Too easy? Try this
Use a heavier band. Or hold 5 seconds at the end position.
Common mistakes
- You lead with your hands instead of your shoulder blades.
- Your elbows flare out to the sides.
- You shrug your shoulders up to your ears.
You should feel
- Strong work between the shoulder blades and in the back of the shoulders.
- Tall, stacked posture.
You should not feel
- Sharp shoulder pain.
- Low back arch or strain.
- Wrist pain.
Stop right away if
- Sharp shoulder pain.
- Numbness or tingling down the arm.
- A pop or catch in the shoulder.
If you are one of our current patients, call the clinic and inform your provider right away, or seek emergency care right away. For a life-threatening emergency, call 911.
Research behind this program
- Andersen LL, Kjaer M, Sogaard K, et al. Arthritis Rheum, 2008. PMID 18163419
- Baskurt Z, et al. J Back Musculoskelet Rehabil, 2011. PMID 21849731
Auto Injury Chiropractic
Same-day visits at three clinics
Oregon City
1404 Molalla Ave
Oregon City, OR 97045
Mon to Thu 9:00am to 6:00pm
Fri 9:00am to 1:00pm
Milwaukie
13152 SE Rusk Rd
Milwaukie, OR 97222
Mon to Thu 9:00am to 6:00pm
Fri 9:00am to 1:00pm
Troutdale
233 E Columbia River Hwy
Troutdale, OR 97060
Mon to Thu 9:00am to 6:00pm
Fri 9:00am to 1:00pm